Showing posts with label embroidery hoop art. Show all posts

25 October 2012

Gingerbread Men in polka dot hoops

Following on from my previous post I have been adding to the polka dot hoop collection....


......with Gingerbread Men hoops.

I am now woking on some cute pastel gingerbread boys and girls.

Have you started your Christmas crafts? What are you making?

23 October 2012

Christmas Market Part 3. Works in progess....polka dots, hoops and felt

Right so am I getting organised for this Christmas Market you ask?
Well some days I think I will finish all the projects I have planned and other days when mummyhood takes centre stage (most days) I wonder if I will turn up on the day with anything at all!


Thankfully I was so inspired when my red and white polka dot fabric ribbon arrived (and the kiddies decided to have long afternoon naps) that I got cracking.

I originally saw the idea for covering hoops with washi tape on Craftgossip. I tried using washi but I found it didn't go on all that smoothly and the colour didn't remain as intense. So I went searching and found this glorious fabric tape on TradeMe.

Once I had covered a few 4" and 6" hoops in this gorgeous red polka dot tape (sorry hubby had the camera so I couldn't take photos of this process) I had a million (well maybe 10!) ideas of what to put in the hoops and I thought I would share with you how I made one of the mushroom hoops.

I chose my backing felt and decided to make two the same. Here I have put the felt in the hoop but not tightened the top screw as I don't want to stretch the felt too much.

I lay out my pieces. As you can see I have based the design on one of my most popular needlebooks.
I pin a couple of piece on and start sewing using whip stitch. TIP: When stitching white onto to colour always put your needle down through the white. If you bring it up, spots of the underneath colour will show through.
All stitched up and ready to be framed.
I use my usual trick of double sided tape on the outside of the inside hoop and then peel off the backing. I fold the excess onto the edge of the hoop.
The sticky side of the hoop goes down onto the back of the felt. I have 'eyeballed' it to get the image centred.
Flip it over and add the outer hoop and ensure that the mushrooms are centred. Then tighten up the screw at the top as tightly as possible.
On the back carefully trim the excess felt off as close to the hoop as possible. Felt is great because it doesn't fray and therefore leaves a clean and neat finish.
Cut a felt circle to cover up the back stitching. I chose navy blue because I happen to have a lot of it to use up!

Use a small amount of fabric glue or double sided tape and attach the backing.

Add a ribbon or ric rac as I have and you are done. I just love how vibrant they are.

I am also working on some Christmas designs which I will share with you soon!

13 August 2012

Benny the Bunny...embroidery hoop art tutorial

Meet Benny the Bunny...isn't he the cutest!

Benny the happy bunny

I finished stitching him last night and framed him up today. I find if I don't frame projects straight away then they have a tendency to slip quietly into the 'unfinished project abyss'.

For me framing has to be simple and effective and able to be completed during a certain child's very short nap time!

So I thought I would share with you my hoop framing process...it is very easy, I promise!

Here are a few bits you will need...
... heavy cardboard ,scissors, fabric marker, pencil, piece of felt....and maybe double sided tape.


Grab the inside ring of your embroidery hoop and trace along the inside edge onto heavy card - I like to use nappy boxes as they are plentiful and sturdy....nobody needs to know there is a picture of Tigger on the back of it!


Trace around the card you have just cut out onto a piece of felt with a fabric marker or ballpoint pen and cut out. (The step is optional...read down to the end of the tutorial to see if you require the felt).


Next I added double sided tape around the outer edge of the inner hoop...this step is optional....I like it as it helps keep the fabric tight but skip this step it if you think you will want to remove your stitching from the hoop one day.

Depending on the width of your double sided tape you may need to fold it slightly over the edge which is fine as it helps stick the fabric.

Next flip your stitching to the back...and yes I am sprung, I am not a tidy stitcher at the back...I tie knots and leap from one area to another but shhhhhhh nobody needs to know.

Place your hoop sticky side down (if you are using tape) and position it to suit your picture.

Next I flip it over and loosely add the outer hoop just to check I have 'Benny' in the correct spot. And I am happy so I straighten my outer hoop and tighten up the screw at the top.


Next trim around off excess fabric all the way around leaving an inch or two to play with.

Delve into your embroidery floss stash to find some thread...as you can see my floss is neatly ordered and numbered (not!).....and I find a strong cup of coffee always helps with framing!

Using 3 strands of any colour cotton tie a nice big fat knot in the end and start a running/gathering stitch.

Stitch all the way around, pulling and gathering lightly as you go...

When you get to the start again tie a nice firm knot.

Lay the cardboard over the back and centre it...


Now the trick is to apply gentle pressure and squish (this is the technical term) the cardboard into the back....it needs to be a tightish fit so the cardboard won't fall out.

And you are done.........

.......or if you would like a slightly fancier finish and to hide the cardboard....
......centre the felt circle over the back and whip stitch it to the fabric.

Apologies for my bad cutting and dubious photography skills in the latter pictures!


02 August 2012

Bambi, a Hedgehog and Wonder Woman

I have been busy stitching and embroidery hooping (that is the technical term!) and these are my latest creations.........

Bambi
Who doesn't love Bambi?

I thought with a green polka dot ribbon hanger that 'Bambi' would be a great 'not too overtly Christmassy' Christmas decoration.

Then there is my old favourite....

Hedgehog

Little Mister Hedgehog sheltering under some Mushrooms....he always seems to pop up in so many of my patterns...sneaky little critter!

And for something totally different...

Wonder Woman
I love this retro design... I can't claim this one, it is from a vintage plastic canvas book. It is a design I used to stitch about 10 years ago onto T-shirts. I still love it just as much now.

You can find them all in my Etsy store.

27 July 2012

More embroidery hoop love....

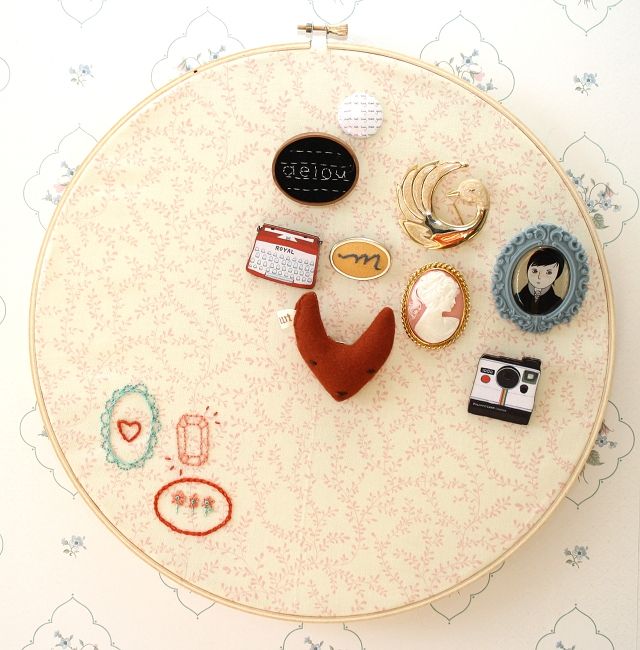
This time it is a gorgeous way to display your brooches.......


You can find all the details at 'one sheepish girl' which is a lovely blog that I follow.

I hope to add a sneak peak of some Christmas hoops & doilies I have been working on soon and stay tuned for a new Etsy store I am opening (like I didn't have enough to do!) selling vintage/retro stitching patterns and canvases......basically it is an excuse for me to frequent many garage sales and markets to find gems from 'Granny's' sewing basket!

Will let you know when it is stocked - I am sure to have some opening bargains.

13 July 2012

Vintage floral cross stitch embroidery hoop

Just something I have been working on that I thought I would share with you....

It is a vintage pattern which I have stitched onto chocalate brown fabric using waste canvas. It is just a 4" hoop so it is a great project size and I have been wandering around the house adding stitches when I can. I like to finish projects quickly so this was a perfect one for me!

Hope you stitching is going well!

P.S This one is for sale on Trade Me if you are interested. Find it here.

05 July 2012

Finally finished....embroidery hoops

So I am getting serious about finishing my projects and doing something with all my completed tapestries and today I set myself the task of completing four and here they are...

Two from a vintage Semco tapestry canvas and....

Two of my own retro pattern designs stitched about 10 years ago...eeeek!!

I love using embroidery hoops to frame them because as a lot of the tapestries are only half done I can just frame the finished bits!

22 June 2012

More Embroidery Hoop love

Now we all know how obsessed I am with all things embroidery hoopish so it is no surprise that this idea tickled my fancy...


fabric wall pocket 4


A fabric wall pocket. Check out Abernathy Crafts for the full no sew tutorial to make your very own.

I think I need one for my shopping list. I will add it to my must do one day tutorial list!

20 April 2012

Embroidery Hoop Art

Hello to all my lovely new followers!

Apologies for the lack of posts lately but we haved moved house and with 2 kids under 2 unpacking has taken forever.

I have however squeezed in some time for stitching. I have had lots of enquiries lately asking if I sell any completed embroideries so I have begun a series of Embroidery Hoop Art.

Here is the first one....

A cute Russian Doll cross stitched on aida and framed in a 6" hoop. It is available here in my Etsy store.

And for something a bit different....

A trio of beautiful butterflies cross stitched on aida and in 4" hoops. Available here.

I am busy working on lots of different designs and hope to have more listed soon.

14 March 2012

Babushka Embroidery Hoop

I have a million projects buzzing around in my head at the moment and most of them are for my daughter's room. It is lovely to have a litte girl to make for.

I am making a series of embroidery hoops to hang in her room. This is the first one...


Just a reminder you can find a free Babushka doll cross stitch pattern (a sister to the above one) on my blog here.

As promised I am trying to use and recycle existing craft supplies and here I have used a jute bag as my background to stitch on. This is what I started with...

I thought I would share with you how I made & framed it.


I used a half cross stitch (or tapestry stitch as I call it) and I love the 'rustic' look that the uneven weave of the bag material creates.


After I had finished stitching I took the outer hoop I am using to frame it and using the inner edge of the outer hoop traced 2 circles onto card and cut them out.


I placed the canvas on top of the inner hoop and just fiddled until I thought it was centred, then pressed down around the edge of the hoop to leave a dent and ensure the doll was in the middle.


Then I added the outer ring and secured it tightly and flipped it over and now you can see all my messiness at the back!


Then I added a piece of card and trimmed the edge of my canvas - not very evenly but it will do the trick!


Then using 6 strands of embroidery thread I used a gathering stitch to pull the back together and knotted tightly at the end.


Then I place the second piece of card over the back and pressed down hard forcing it so it stays in place. Because I used a thick fabric this worked really well but it is probably a good idea to use some glue on the back of the card and then place some weight on it to dry and set.

Now this is probably not exactly how it should be done but you know me I am already eyeing up the next project so if I don't finish things quickly they won't get done!

Now what to start next......