The found the fabulous sandwich pattern on pinterest and it is from the lovely Tania of Myrtle & Eunice so if you want to make one of your own you can find the tutorial here where there is a link to the templates. She also has a full tutorial to follow too.
I will show you what I have done with mine.....
BREAD
I followed the original instructions .....I didn't have a thick foam though so I cut 3 pieces of thin wadding for each piece of bread. Also I didn't have a long enough piece of felt for the crust strips so had to cut two strips and join them together.
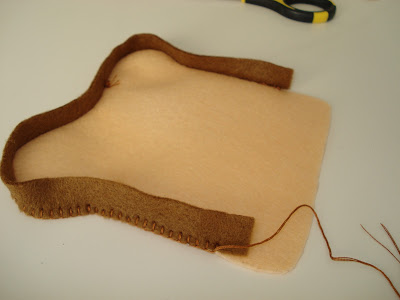
I used 3 strands of brown floss and started blanket stitching a crust onto one side of the bread...
Just before I got to the end of stitching on the first piece of crust I stopped and lined up the second piece of crust with a little overlapping, pinned and carried on stitching...
....until all joined up...
Then start stitching on the other side of the bread.....
...then about half way round put your stuffing in and then continuing blanket stitch around....and too cute 2 slices of bread!
CHEESE
I cut 2 pieces instead of one because my felt is acrylic and a bit thin and I could just see the kids having tug of war over it and the cheese coming off second best. So I used blanket stitch and stitched the 2 pieces together including the inside of the holes and now it child ready!
LETTUCE
Ditto with the lettuce I cut two pieces and used running stitch for the detail and then blanket stitched the 2 pieces together. Here is the front.......and here is the back....
FRIED EGG
This one is nice and easy and a great one to start with with if you are new to hand sewing.
There is no pattern for this as such. Use your lettuce size as a guide and freehand an egg shape onto card, cut and trace 2 egg whites onto white felt and then just cut a circle of yellow felt.
Pin your yolk to one of the egg white pieces and whip stitch it on using 2 strands of matching yellow floss. Stitch 3/4 of the way around and then stuff with a little polyfill and then stitch closed.
Next just blanket or whip stitch this onto the second egg white...done!
TOMATO
I followed the original instructions sort of...I just cut two piece of felt for each tomato slice and cheated by only stitching the segment detail onto one side.....
Then just blanket stitched the two sides together......
Then put all your bits together and you have a scrummy sandwich!
Or two scrummy open sandwiches.....
Or two scrummy open sandwiches and a fried egg!
It really is quite fun to play with, I can't wait for my son to see it - he will love it!
Next up I am going to make a felt sandwich bag to keep all the pieces together. Then after that it will be biscuits and cupcakes. I have just under a month to get it all done plus overhaul the picnic basket itself and make all tablecloth and napkins etc
Hmmmm if only there were 8 days in a week!


thanks for the useful tutorial and for sharing it! :)
ReplyDeleteThanks a lot from Poland. This was my first felt experience and not the last one I feel. And even my nearly 3 years old left her few first stitches on the lettuce leaf:)
ReplyDeleteThank you for tutorial! I have a question: does that filling inside the bread piece fluff on the side with time or not?
ReplyDeleteLooks like a great place to start with felt foods. Thanks for sharing!
ReplyDelete