I have been perusing my favourite blogs and have just visited Cat Taylor Design .
Check out her lovely blog and sneak a peek at the gorgeous creations in her Felt and Etsy stores.
She currently has a Christmas giveaway competition with a pack of crafty goodies to be won.
I am coveting the beautiful bias!

01 December 2010
Christmas Stocking

Finished at last!
It is my son's first Christmas this year so I thought it was the perfect excuse to
start yet another craft project - a Xmas stocking.
I found the pattern in the fabulous Toffee magazine (blogged about below!) and adapted it
slightly as I am not very good at sticking to patterns even my own.

Oliver's stocking has cute birdies on one side and gingerbread men on the other.
I am most proud of the fact I used all materials from my stash and didn't buy anything to make it.
As my husband was very keen to point out it won't exactly fit much in it...
but that is not the point because it is so cute!!
You can check out other stockings made from the same pattern on flickr
My next project is making dough gingerbread ornaments - stayed tuned for the results!
Toffe Magazine - Launch Isssue

I recently stumbled upon this fabulous new crafty magazine while perusing the lovely Haby Goddess blog and was so excited to discover that you don't have to trek out to the shop to get it...you can download it on the spot for just $2.99 AU - Instant Gratification!!
It is full of crafty pages and patterns and has printable projects - Yeah!
It features a great Chhristmas stocking pattern which I found really easey to use and will post about next.
Get your copy of Toffee here
14 November 2010
Free Christmas felt ornament pattern - Gingerbread man

Make your own cute Gingerbread Christmas decorations.....

You will need......
- Brown & Red felt
- White ric rac
- ribbon for hanging tag
- dark brown, light brown and white embroidery floss
- pins, embroidery needle
- nice sharp scissors

Double click on the above template to open it in a new window.
Right click and select print picture and print onto A4 paper
- it will print at the correct size of 5" (13cm high)
Glue or trace onto cardboard to make it easier to use.
Cut two of the body out of brown felt and one heart out of the red felt
-N.B I have actually used a puffy heart I had in my stash, a button would work well too.

Use 6 strands of the dark brown floss and use French knots to create his eyes and
back stitch to make his mouth (visit DMC stitch guide for help with different stitches!)
Use 2 strands of white floss and use a runnibg stitch to attach the heart.
Use 2 strands of dark brown floss and do 3 cross stitches to make his buttons.

Using 2 strands of white floss add strips of ric rac onto legs and arms with a running stitch.

Using 3 strands of light brown floss start blanket stitching the front and back bodies together.

Using 2 strands of white floss stitch the hanging tag to the back of the top body -
making sure the stitching does not show through to the face.

Finish blanket stitching around and you are done!!
For something different add a bit of polyfill stuffing to make a chubby gingerbread man.
13 November 2010

09 November 2010
Babushka Christmas Angel

I am still obsessed with Russian Dolls and Christmas so have combined
my two favourite things!! Get your cute Xmas Angel here
08 November 2010
Felt Christmas Decorations

I am slightly obsessed with felt at the moment and am decorating
my entire Christmas tree in felt ornaments this year - I am going to be busy!!
You can view more photos of my Xmas creations on my flickr page
Cutest Gingerbread House in the world!!!

Isn't this the most adorable wee Christmas decoration ever!!
I spent hours and hours and hours cutting out teeny tiny pieces of felt and stitching teeny tiny stitches.
You can view more photos of the cutest gingerbread house in the world (!) on my flickr page
I would love to make you an adorable house for your Christmas tree.
27 October 2010

26 October 2010
Christmas cross stitch quickies!

I have just finished a couple of cute Xmas designs - perfect size for Christmas decorations.
PDF pattern is available here
20 October 2010
Buttons cute enough to eat!

I have just added a whole heap of cute buttons and hair ties to my felt store......

I love these little fast food buttons - so cute for kids clothing or craft projects.
Click here to visit my online store.
15 October 2010
Toy Soldiers!

Have finally finished my latest cross stitch/tapestry pattern...
Super cute toy soldiers - perfect for embellishing all sorts of Christmas items!
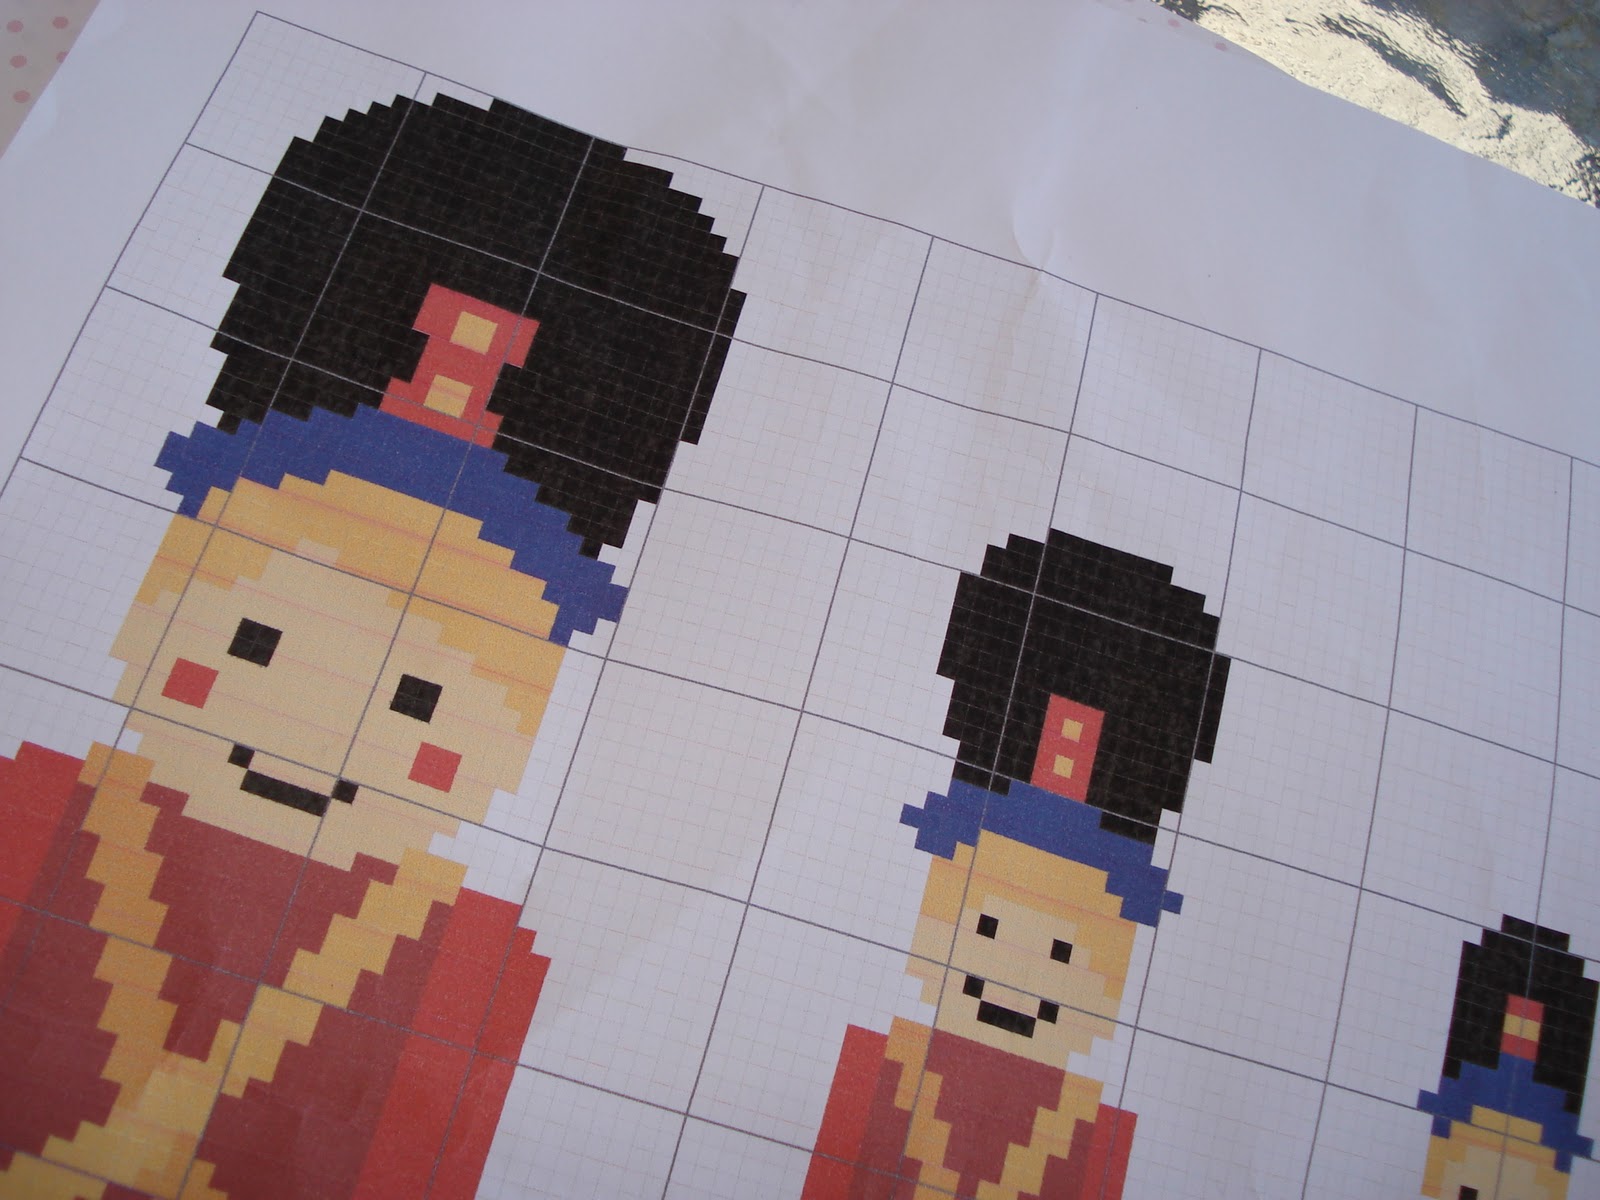
I have designed 3 sizes so they are adaptable to suit lots of aida/canvas projects.
Click here to purchase your pdf pattern...
Not need to wait by the mailbox I will just email it to you ASAP
so you can get stitching straight away!!

I stitched this bib for my 6 month old but have decided he is too much of a grub
and I can't bear the thought of scrubbing pumpkin off it so it is available for sale here

Here is the little 'grub' - sorry couldn't resist adding a photo!!
12 October 2010
Upcycled Cushions!

Quick creative project of the day........
I bought these retro cushions at the warehouse and they were a bargain at only $7 each but I decided they needed a little 'tarting up' so I have sewed tiny doily circles and vintage buttons on...

Just a couple of loops through the button and it is easily attached - cute!
08 October 2010
Custom Flower - made from your Frock Fabric!

That's right just send me the scraps from your Frock and I will create a beautiful
flower like those shown in the photo that will match your outfit exactly!

You can then choose to have a brooch back OR a half comb
put on the back depending on how you wish to use the flower.
Click here to purchase your flower!
06 October 2010
Plastic canvas purse!!

My latest creation - a fantastic kitschy plastic canvas purse!

I found the purse shape canvas at Spotlight and had to give it a go.
I have stitched it using 8ply craft wool and went for a random spot pattern.

I fashioned a fastening using some vintage buttons and just
wound an elastic hair tie to keep it tight - easy!
I am using the purse to store my embroidery threads for my current project -
beats the daggy plastic bag I usually house them in!
29 September 2010
Christmas Cross Stitch!

I have stitched this cute xmas russian doll design using tapestry stitches on fine linen and I am going to frame it to make an adorable xmas ornament! This doll features holly in her hair and a christmas cupcake on her tummy. I am also working on a xmas pudding and other Christmassy designs to join her on the tree.
Click here to buy the pdf pattern so you can stitch your own xmas Babushka.
It would be super cute stitched on tea towels, napkins etc
Happy stitching!!
24 September 2010
How to frame an oval tapestry!

I was framing this cute wee tapestry and
I thought I would create a tutorial to explain how I did it.
(NB I have a free stitching pattern for a similar Russian Doll here )
(NB I have a free stitching pattern for a similar Russian Doll here )

This is a cute wee vintage frame I found at the local charity shop.
It is a flexible green rubber outer with a stiffer white plastic insert.
Here I am gauging where I to place the tapestry for best effect.

I have placed the white ring underneath the tapestry.

Then the green frame is put on - as the frame is flexible you just
have to force it over the white inner frame - easy!

This is what the back looks like with the frame on.

Then I have added a piece of white card to the back.

Next trim the material leaving a couple of inches to play with.

With a strong thread do a gathering stitch to bring the fabric together at the back.

Cut another piece of card to cover the mess!

Place a bit of glue behind the card and force it into the back of the frame.

Cover it all with black felt and you are done!
Word of advice before you position your tapestry I would recommend
tracing around the inner white ring to ensure your cardboard pieces are the correct size.
I didn't so mine are a bit random but you can hide it all
under the felt and nobody will be any the wiser!
under the felt and nobody will be any the wiser!
In saying that if you would like to buy this one (!) you will find it here
23 September 2010
Cupcake yoyo brooches!

Click here to see (and purchase!) designs.
Happy to do custom orders for parties including bulk discounts.
Coming soon a step-by-step tutorial on how to make them yourself....as soon as all my crafty goodies arrive in a container from Australia!!
20 September 2010
Gorgeous wee Russian Dolls
Russian dolls or Babushkas or Matryoshka dolls are my new favourite thing at the moment.
I have designed this sweet wee tapestry and completed it with teeny tiny stitches on Ecru fine weave linen - I am now thinking of investing in a magnifying glass and miners hat complete with light to aid the process!
You too can stitch this delightful design - check out Russian doll #1 pdf pattern (left hand doll) or Russian Doll #2 pattern (right hand doll) in my Etsy store to purchase the pdfs - no need to wait for the post to arrive I can email it to you ASAP so you can start stitching.
You don't even need to go out and buy more threads as this is a great little project to use up all your left over threads (although I do provide a chart if you prefer).
Ideal as a cross stitch or tapestry using any size of canvas of aida. The pattern is easy to use as one square represents one stitch. Choose 14 count aida and you will get a larger doll!
Easier still buy the completed tapestry here and use your creative sewing skill to incorporate the design into a cushion, purse, ipod cover or anything that takes your fancy.
Also coming soon (between renovating a house and looking after a fiesty 6 month old boy!) will be an already framed version + another delightful Russian doll pattern who will be joining her sisters + a gorgeous wee toy soldier design.
Stay tuned!!
I have designed this sweet wee tapestry and completed it with teeny tiny stitches on Ecru fine weave linen - I am now thinking of investing in a magnifying glass and miners hat complete with light to aid the process!
 |
| So cute!! |
You too can stitch this delightful design - check out Russian doll #1 pdf pattern (left hand doll) or Russian Doll #2 pattern (right hand doll) in my Etsy store to purchase the pdfs - no need to wait for the post to arrive I can email it to you ASAP so you can start stitching.
You don't even need to go out and buy more threads as this is a great little project to use up all your left over threads (although I do provide a chart if you prefer).
 |
| Teeny tiny stitches! |
Ideal as a cross stitch or tapestry using any size of canvas of aida. The pattern is easy to use as one square represents one stitch. Choose 14 count aida and you will get a larger doll!
Easier still buy the completed tapestry here and use your creative sewing skill to incorporate the design into a cushion, purse, ipod cover or anything that takes your fancy.
Also coming soon (between renovating a house and looking after a fiesty 6 month old boy!) will be an already framed version + another delightful Russian doll pattern who will be joining her sisters + a gorgeous wee toy soldier design.
Stay tuned!!
Subscribe to:
Posts (Atom)