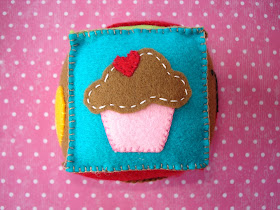
You will need:
Assorted pieces of felt:
Larger pieces for the sides
Scraps for the pictures
Scissors
Pinking Shears (if you have them)
Embroidery floss (stranded cotton) in various colours
Polyfill
You can download the pattern HERE
Cut out 1 of each pattern piece for all the pictures in appropriate felt colours.
Before you start sewing I would recommend laying out all the pieces and deciding which background colours the pictures look best on and the order they will be on the cube.
Sorry I haven't got a step-by-step photo tutorial for this one but I will talk you through each side....
NB: I have used 2 strands of cotton and whip stitch to attach all the pattern pieces.
Mushroom:
Cut some freehand white circles for the mushroom spots and stitch onto the mushroom head.
Stitch the stem to the background.
Stitch the head on.
Stitch the grass on.
Duck:
Stitch the wing to the body.
Stitch the body to the background.
Stitch the beak on.
Add a French knot for the eye or just a cross stitch if knots aren't your thing!
Cupcake:
Stitch the base to the background.
Stitch the top on (I have actually used running stitch here).
Stitch the heart on.
Ladybird:
Stitch the body to the background.
Stitch the head on.
Cut some small black circles and stitch to body (I have used a cross stitch).
Add black backstitch for line on the body and antenae (plus 2 French knots on the ends).
Apple:
Stitch apple to background.
Stitch stalk on.
Hedgehog:
Cut the body out using pinking shears (if you have them).
Stitch grass onto background.
Attach body to background using running stitch (slightly overlap the grass).
Attach face on.
Add nose and eye details in any stitch you fancy.
FORMING THE CUBE.
I have used blanket stitch to sew the sides together but whip stitch will work fine too.
Join 2 sides together by putting wrong sides together and stitching.
Add another side to the 2 by the same method.
Add another so you have 4 sides forming a square but don't join the final seam yet.
Now start sewing the top one side at a time.
Then sew on the bottom one side at a time.
Now you can stuff with polyfill through the side seam.
Then sew closed.
DONE!
P.S Hope this makes sense (feel free to ask questions!)


thank you so much for sharing this lovely project!!!
ReplyDeletexxx Alessandra
What a cute little toy! I love it! Thanks for sharing!
ReplyDeleteThank you so much for sharing your pattern! I am finding that patterns are hard to find. I am just learning how to do projects like this, so I really appreciate it. Thank you! :)
ReplyDeleteThis is great. Thanks for sharing. I'm in the final stage of putting mine together now. I've making a set of three to give to a mum-to-be for her baby girl. The other two cubes are going to have ABC and 123, animal faces and shapes. Hope they turn out just as good.
ReplyDeleteNot free at all!
ReplyDeleteOh no Angie I see they are now charging to access free patterns in scribd. Sorry about that I uploaded the patterns years ago when it was free. You can still get around it though. Just right click on the pattern in scribd and select open in new window then 'save as' onto your computer and there you go it will be the right size. Hope this helps and sorry if it made you cranky. Kim
DeleteHow cute it is. Love this felt cube. Thanks for sharing this felt toy DIY.
ReplyDeleteNice cube for babies! Thanks for posting!
ReplyDeleteAvast Tech Support Phone Number
Mcafee Technical Support Phone Number
Norton Customer Service Phone number
avg antivirus tech support phone number
webroot support phone number
kaspersky customer service Phone number
bitdefender customer service phone number
Malwarebytes Tech Support